This post is actually a pre-requisite to a new pattern I'm working on. I love all the flowery headbands on Ravelry, but I don't love having to create each flower individually, and then fasten them together. I'm determined to make a flower chain headband that isn't such a hassle.
I looked around for a good five-petal flower pattern, and I found this one over at Attic24. So far, it's my favorite!
I've only just started my flower chain headband, but already i'm pretty excited about how it looks. Crossing my fingers that I'll have the pattern up by the middle of the week!
Sunday, March 24, 2013
Tuesday, February 12, 2013
Cuff'd Fingerless Gloves
My best friend in high school had a pair of fingerless gloves she wore all the time. I could not for the life of me understand their purpose. Fingerless gloves? What is that? How are those supposed to keep you warm? It wasn’t until I made my first pair quite recently that I understood the allure. Now I’m a huge supporter. Fingerless gloves! Fashionable and functional!
In case you are a skeptic like I was, here’s a list of all
the things you can do with fingerless gloves that you can’t do in regular, old,
knit gloves:
- Use your IPhone
- Easily text
- Pick up objects
- Eat food without eating yarn hairs
- KNIT (that’s a big one)
- Turn pages
- Show off your nail polish
- Look bohemian
- Pick your nose
- Play guitar
- Play the flute
- Pet a dog
- Do origami
If you’re not convinced yet, take a look at this adorable
fingerless glove pattern, and then tell me you aren’t in love.

That’s what I thought.
This pattern uses a lateral braid, which, if you don’t know
how to do, is a very useful little trick. Check here for an awesome tutorial on
the lateral braid. If you’re still totally intimidated, you can eliminate the
braid and simply purl those rows...but you should learn the braid!
Alright, let's get to the pattern!
CUFF’D
Yarn: any
variegated worsted yarn will do- the skein I used was homeless, and had tag or
wrapper on it
Recommended Needle Size: US #8
Notions:
Stitch markers
Yarn needle
Stitch holder or scrap yarn (scrap yarn works better for
thumb gusset)
Gauge:
16 stiches x 25 rows = 4in by 4in in the round
Pattern Notes:
M1: make one stitch by picking up the yarn in between the
stitches from back to front and knitting into the front
pm: place marker
sm: slip marker
CO: cast on. I recommend long-tail cast on for this
ssk: slip two stitches knit-wise, knit both together
k2tog: knit two stitches together
yo: yarn over
BO: bind off. I recommend using the k2tog bind-off method
wyif: with yarn held in front
sl1kw: slip one stitch knit-wise
Reverse Linen Stitch: worked over four rows
1: k
2: *(wyif sl1kw, k1); repeat from * around
3: k
4: *(k1, wyif s11kw); repeat from * around

Directions:
CO 30 stitches, place marker and join in the round
Rows 1-3: knit
4: *k2tog, yo; repeat from * around
5-7: knit
8: purl
9: k
10: p
11-12: k
13: *k2tog, yo: repeat from * around
14-15: k
16: p
17: k
18: p
19-20: k
21: *k3, k2tog; repeat from * around – 24 sts
22: work lateral braid
23-30: work reverse linen stitch, ending on a pattern row
31: work lateral braid
32: k
Both hands are worked exactly the same up to this point.
Right hand:
33: k1, pm, k1, pm, k to end
34: k1, sm, m1, k to marker, m1, sm, k to end
35: k
Repeat rows 34 and 35 until you have 13sts between the
markers. Knit three rows plain, then set up before dividing for the hand:
k1, remove marker, k2tog, replace marker, k to last 2sts
before marker, place marker, ssk, remove marker, k to end – 9sts between
marker, 26 on hand
Divide for hand:
1: k2, place thumb sts on holder, k to end – 26sts
2-8: k
9-12: work in 1x1 ribbing
BO
Left hand:
33: k to last 2sts, pm, k1, pm, k1
34: k to marker, sm, m1, k to marker, m1, sm, k1
35: k
Repeat rows 34 and 35 until you have 13sts between the
markers. Knit three rows plain, then set up before dividing for the hand:
k to marker, remove marker, k2tog, replace marker, k to last
2 sts before marker, pm, ssk, remove marker, k to end – 9sts between marker, 26
on hand
Divide for hand:
1: k to marker, place thumb sts on holder, k to end – 26sts
2-8: k
9-12: work in 1x1 ribbing
BO
Thumb:
1: k 9sts from holder, pick up 7sts along the hand – 16sts
2: k
3-6: work in 1x1 ribbing
BO
Repeat on the other hand

And that’s it! Wear them around looking fancy, or have your
artistic roommate take pictures of you drinking out of a mug that isn’t yours.
Please do not sell the pattern or the finished product, as I’m
planning on selling these in my Etsy store once I get it on it’s feet, but make
as many pairs as you’d like for yourself or your loved ones! As always, credit back to The Life
Artistic. Ciao!
Friday, November 23, 2012
Earflap Fuzzy Hat Pattern

I tend to be a yarn hoarder.
I have a stash of yarn that’s at least eight years old. It’s left over from a
time when all I wanted to knit was pink, fuzzy scarves, and now that I’m a
classy college kid (haha) it’s just been taking up space. After an afternoon of
searching through this yarn treasure chest, I found these two unusual yarns,
and some Red Heart Classic I was never going to use, and the Ear Flap Fuzzy Hat
was born!
This is an awesome pattern
to use up those random skeins. It’s warm, cozy, and absolutely silly. It’s also
a nice, simple ear flap pattern, so if you’re feeling boring, you could always
skip the color change and make something more practical!
I made my hat larger than I
normally would because I didn’t want it to flatten out my hair. If you want a
smaller, snugger hat, I’ve adapted the pattern for both sizes. The instructions
for the larger size are in parentheses. If your head is bigger than 22 inches,
or you want the loose look like in the pictures, go with that.
One final note: The pink
yarn I used is a multi-weight yarn—it changes as you knit. I don’t know what
that type of yarn is called, but it’s listed as “worsted” on the tag. I’d say
you’re pretty much golden with whatever yarn you choose, as long as check your
gauge for the Red Heart Classic Solid and only knit for 2 ½ inches when you
switch colors.

Gauge: In
Red Heart Classic Solid, with size 8 needles in stockinet stitch: 4”x4” = 16sts x 24 rows
Yarn:
1 skein Jai Alai, or similar
fuzzy yarn
1 skein Red Heart Classic
Solid
1 skein pink worsted weight
yarn
Materials:
16-inch size 8 circular
needles
5 size 8 double-pointed
needles
Stitch markers
Small pom-pom makers
Size J crochet hook
Tapestry needle
Pattern Notes:
Inc: Unless otherwise noted,
increase by knitting into the front and back of the stitch
Dec: All decreases are k2tog
Ear Flap Fuzzy Hat
Ear Flaps—make 2:
With strands of Jai Alai and
Red Heart Classic held together, CO 3. Work flat.
Row 1 (RS): knit
Row 2 (WS): k1, inc by
picking up st in between, k1, inc by picking up st in between, k1
R3: k
R4: k1, inc, k to last two
sts, inc, k1
Repeat rows 3 and 4 until
you have 17(19) sts on the needle
Work 7(5) rows in garter
stitch.
Row 8: join earflaps to hat!
Hat:
 Working from RS of one
earflap using circular needles, place marker, k across earflap. CO 22 sts, k
across 2nd earflap, CO 16(20) sts, and join in the round. 72(80) sts
on needles.
Working from RS of one
earflap using circular needles, place marker, k across earflap. CO 22 sts, k
across 2nd earflap, CO 16(20) sts, and join in the round. 72(80) sts
on needles.
Work 1½ inches in garter
stitch using Jai Alai and Red Heart Classic.
Switch to pink worsted
weight yarn, and begin working in stockinet stitch. Work 2½ inches in stockinet
stitch—4 inches from edge of hat
Switch to Red Heart
Classic Solid.
Larger size only:
Round 1: k all stitches
Round 2: [k8, k2tog] around –72sts
All sizes
Round 1 and 2: k all
stitches
Round 3: begin decreases,
switch to double pointed needles when needed— [k7, ktog] around –64sts
Round 4: k all sts
Round 5: [k6, k2tog] around
–56sts
Round 6 and 7: k all sts
Round 8: [k5, k2tog] around
–48sts
Round 9: k all sts
Round 10: [k4, k2tog] around
–40sts
Round 11: k all sts
Round 12: [k3, k2tog] around
–32sts
Round 13: k all sts
Round 14: [k2, k2tog] around
–24sts
Round 15: k all sts
Round 16: [k1, k2tog] around
–16sts
Round 17: [k2tog] around
–8sts
Cut a tail about six inches
long, and thread through all 8sts on the needles. Pull tight.
Weave in ends.
Edge and tassels:
Using Red Heart Classic and
size J crochet hook, start at the base of one earflap. Sc around entire edge to
the base of the 2nd earflap, chain 28, and fasten off. Repeat for
other half of hat. Make three pom-poms, and attach to end of tassels and top of
hat.

That’s it! All done!
Please use this pattern for your own enjoyment, but
do not sell the pattern or finished product without my consent. As always,
link back to thelifeartistic.blogspot.com, and let me know if you have any
questions!
Wednesday, October 24, 2012
The Most Amazing Microwave Cake Ever.
I love chocolate.
Like any normal person, chocolate is one of those things that I could just nom on every day, in all shapes and form.
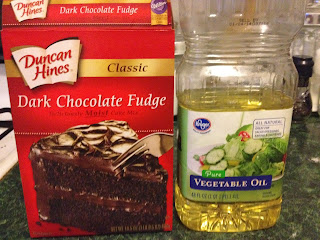
The other day, I got a fierce craving for chocolate cake. So, while I was at the grocery store, I picked up some Duncan Hines Dark Chocolate Cake Mix. I like Duncan Hines because the mix itself is vegan, and it's still pretty cheap and delicious. This cake mix sat in my cabinet for a while, waiting for me to have enough time to bake cake.
Here's the thing. I'm a college student. I'm an actor. And I have a job. And did I mention homework? Baking a cake is way down on the priorities list- and I mean WAY DOWN.
But today, I invented something marvelous. Meet:
The Most Amazing Microwave Cake Ever.
 Ingredients:
3 tbsp Duncan Hines Dark Chocolate Cake Mix, or pretty much any Duncan Hines Cake
1 tbsp water
1/2 tbsp vegetable oil
For the Frosting (optional):
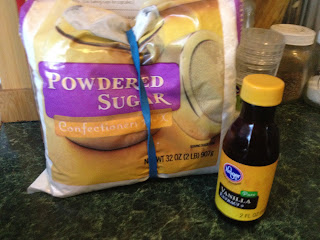
2 tbsp confectioner's sugar
1/4 tsp water
1/4 tsp vanilla

For the cake: combine all ingredients in a small, microwave bowl (ramekins work well) and mix until moistened.
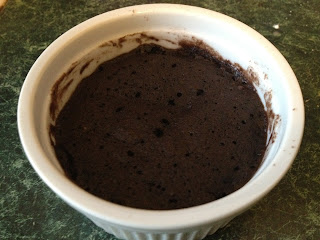
Microwave on HIGH for 45 seconds, or until a fork comes out clean. For the frosting: combine all ingredients together. Add another tsp water if mixture is too thick. Frost the cake, and dive in!!
Alternatively, you can just sprinkle with powdered sugar.
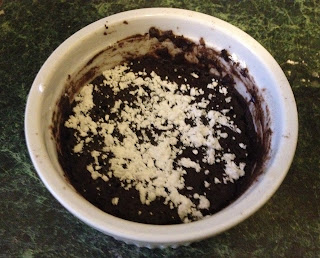 Seriously, the most delicious end to my day. It's been a long time since I've written anything, mainly because I'm starring in a show called Proof that opens very, very soon. But this cake was just too good to pass up. I know there are a lot of recipes floating around for microwave brownies, but none of those ever turned out quite as well as this did for me. P.S. I didn't post a picture of the cake with the frosting because, well, it just looks kinda... weird. But we all know what frosting looks like!
I hope you enjoy your single serving cake! I know I did. Yum.
Like any normal person, chocolate is one of those things that I could just nom on every day, in all shapes and form.
The other day, I got a fierce craving for chocolate cake. So, while I was at the grocery store, I picked up some Duncan Hines Dark Chocolate Cake Mix. I like Duncan Hines because the mix itself is vegan, and it's still pretty cheap and delicious. This cake mix sat in my cabinet for a while, waiting for me to have enough time to bake cake.
Here's the thing. I'm a college student. I'm an actor. And I have a job. And did I mention homework? Baking a cake is way down on the priorities list- and I mean WAY DOWN.
But today, I invented something marvelous. Meet:
The Most Amazing Microwave Cake Ever.
 Ingredients:
3 tbsp Duncan Hines Dark Chocolate Cake Mix, or pretty much any Duncan Hines Cake
1 tbsp water
1/2 tbsp vegetable oil

For the Frosting (optional):
2 tbsp confectioner's sugar
1/4 tsp water
1/4 tsp vanilla

For the cake: combine all ingredients in a small, microwave bowl (ramekins work well) and mix until moistened.

Microwave on HIGH for 45 seconds, or until a fork comes out clean. For the frosting: combine all ingredients together. Add another tsp water if mixture is too thick. Frost the cake, and dive in!!
Alternatively, you can just sprinkle with powdered sugar.

Wednesday, September 19, 2012
Lace Overlay Skirt Tutorial

Lace overlay is so in right now. I see lace everywhere; dresses, shirts, blouses, jackets, skirts, suits, hats, underwear...it's everywhere! I love love love the lace overlay skirts. I was on pinterest.com and I saw this adorable skirt on styleaddict.com. My first thought: "I can remake that!"
The lace is actually a hand-me-down from my mom. She used it to make some sort of fairy costume for me and my sister when I was younger, and offered it up to me last time I was home. And the lace overlay skirt tutorial was born!
So. Deep breath. Here goes my first sewing tutorial. Let me note that I am a very beginner sewer-- I like to consider my self a crafter above all else, but really I'm into crochet and knitting with other things on the side to keep me entertained. Sewing is still quite new to me (just take a look at that uneven edge up top! woof!)
That being said, I think this is a great project for anyone of anyone skill range! It's a little fiddly, but if you have a french curve or a really good eye, this could be made in under an hour.
So let's get started!
You will need:
- 1.5-2 yd of lace, or enough to wrap around your body
- 1.5-2 yd of broadcloth (or enough to wrap around your body) in a corresponding color--but I bet it'd look cute with some contrast!
- 7" to 10" invisible zipper--mine was 12" and I cut it down to 8"
- Matching thread
- Sewing machine!
- Hook and eye closure for top
Step 1: Take your measurements
Measure around the smallest part of your waist or where you want the skirt to sit-- my measurement was 26". Now measure around the widest part of your hips. Last, measure the distance from the widest part of your hip to where you took your waist measurement. A couple of notes: The length of my skirt turned out to be roughly the width of my fabric. You'll want to have enough fabric to cut out two squres. Also, you'll want to do this measuring in your undies in order to get an accurate measurement. My measurements were a wee bit off, and the skirt came out all bunchy and loose! I had to fix up the side seams later, causing my top hem to be all wonky.
Step 2: Take 1/2 your waist measurement, and add 1". Fold your broad cloth in half, raw edge to raw edge. Mark your hip measurement and cut out two pieces. The pieces will be roughly square, or should be! Fold each square in half, and mark 1/4 of your waist measurement from the fold. Unfold. Now do the same thing with the lace material, but leave a little extra lace on the bottom. My lace has a nice finish on the selvage edge that I could work with. This is what you should have:

Step 3: I don't have many pictures after this because I was so excited to finish, but it's all pretty clear from here on out. Pin the top edge of your lace to the top edge of your broad cloth, right sides together. Overcast or zig-zag stitch the pieces together. Turn right side out, and press. Now's the time to hem the broadcloth! I did a 1" hem.

This is what you should have:

Step 4: Move to the top of the skirt. Fold the joined fabrics down one inch, pin, stitch and top stitch. Repeat with second pattern piece. Once you finish this, you'll want to check and be sure your top hems match up to avoid my messy seams!

Step 5: Pin the front and the back of the skirt together. Mark the waist to hip measurement from the top of the skirt down.

On one side, draw a slight curve from the mid-measurement to where you marked your waist in Step 2. You can eyeball this part, or use a french curve to make the line. Sew the seam and up along that curve ON ONE SIDE.

On the other side, mark the same curve. You will be inserting the zipper along the curve. Measure that length, and cut your zipper to size.
Now cut your fabric, allowing at least half an inch of seam allowance on the curve, where your zipper will be inserted. I used an invisible zipper. Invisible zippers give you special instructions on how to insert them, including when to sew the rest of the seam below the zipper. Now, go ahead and follow whatever instructions your zipper gives. Trust me-- you will get the best results!
Last but not least, hand stitch a little hook and eye into the top of the zipper.
And you're all done! Turn the skirt inside out, and wear proudly!

I'm really excited about this post because it is my first ever sewing tutorial!!! I think this skirt turned out way cute, and it was ultra cheap. I found the broadcloth as a remnant (how lucky!) so that only cost $1, and the zipper was on crazy sale for $1.50. Not too shabby compared to the $65 from styleaddict.com!
Saturday, September 15, 2012
A week of success!
After a long, productive week, I'm treating myself. I'm visiting my sister in Raleigh, NC. She's studying entomology, and today is BugFest at the science museum! We're going to take a few hours to check it out, and maybe even eat some insects--blegh! Then we're baking vegan macaroons, and going shopping for her apartment. All-in-all, today's my treat. I'm taking a break.

But I'm also posting!
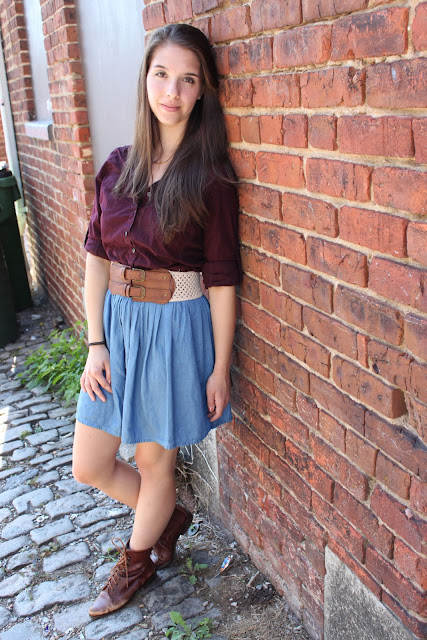
One of my classmates took a couple photos for an interview I had. I liked this one so much, that I thought I'd throw it up here! Thanks, Byron :)

Shirt: Target, on sale
Belt: Forever21
Skirt: Homemade!
Boots: My roommate's highschool's costume shop
I'm definitely not the most fashionable person in the world, but I loved the way this turned out!

Also wanted to post another picture of my Ivory Eshe Necklace Knock-off. You can really see how cool it is when I'm wearing it!
And that's it for now! I'm working on knitting a vest right now, and I'll be sure to post that once I'm done.
Happy Weekend!
Tuesday, September 4, 2012
Anthropologie DIY! Ivory Eshe Necklace Knock-off
I have a love-hate relationship with Anthropologie. I hate how expensive everything is (so expensive that I've never made a purchase there!) but I love all their crazy weird clothes and jewelry.

Now, I admit that my picture isn't very good, but I'm pretty proud of the outcome! It was super cheap, if a little challenging to make. I had the seed beads, and all I needed were some fake pearls, a few 1" eye pins, and those little bitty bead tips. I'd be happy to post a tutorial if you're interested :) just let me know!
Subscribe to:
Posts (Atom)